
For some reason I had the vision of the jack collapsing and felt I needed someone around in case of emergency. So, I called a good friend and asked to borrow his driveway. Tiger is his name - his real name. His wife is equally incredible: http://kimmanthey.com/
Disclaimer: I am not a professional mechanic and these instructions can be used as a basic guideline to replace your front brake shoes on almost any caliper brake vehicle. Mine so happens to be a 2005 Kia Sorento. Also, it is recommended to use brake grease (which I did not use, never have) and did not replace a hard plastic spacer on the outside brake shoe. The plastic piece is placed on the outside part to prevent the caliper from sticking to the shoe... which again, I have never used. Please use all precautions, blocks, braces, engine off, emergency brake off.
Tools: 14mm socket wrench, hammer, 4" C-clamp, block of wood (i have a small cut 2x4), lug nut wrench, jack, jack stand, and a block, brick or something to use to place behind back tire.
Here is a handy diagram of a brake caliper: http://auto.howstuffworks.com/auto-parts/brakes/brake-types/disc-brake5.htm
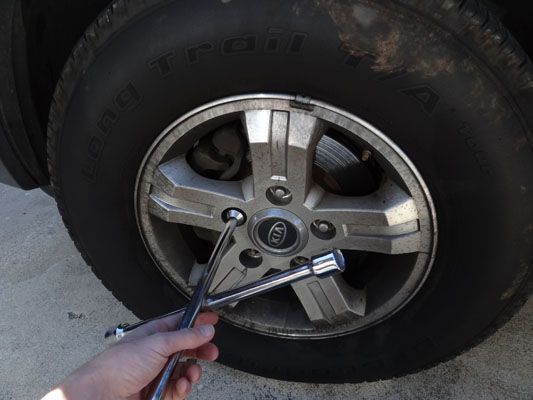
Step 1: Loosen lug nuts of tire while still on ground.
Step 2: Place block(s) behind rear tires for safety.

After the tire you are removing is off the ground - when you get close the tire should shift. Once the tire shifts, raise the height using the jack so your jackstand will fit and support your vehicle. Slide the stand into position and slowly lower the vehicle down so the weight of the vehicles is properly supported. I leave the jack in place in case the stand slips and there is a backup support. If you use a hydraulic jack, make sure the release valve is tightened.

Step 4: Remove tire
Step 5. Using a 14mm socket, remove the two bolts holding caliper to rotor.


Above: finger pointing to the top bolt and wrench on the bottom.
Step 6: GENTLY use the claw side of hammer to remove caliper. Notice the emphasis on gently, I don't want anyone to damage anything. You will be able to see how the caliper is distancing itself. Alternate between the top and bottom (shimmying) until it comes loose. DO NOT LET THE CALIPER HANG FROM THE HOSE!!!!! In the photos, I am either supporting with my hand or it is resting on the rotor.

Above: Use the two spaces available to pry the caliper off.

Step 7: PISTONS. This is, honestly, the only tricky part. Here you will use the 2x4 and c-clamp. You don't need no sticking badges... or fancy tools.
-Place block at the top of the pistons.
- Using c-clamp position as in the photo.
-I have two pistons to depress, so tighten one side then the other. Repeat this until both sides are flat.


Step 8: If you have brake grease, now is the time to use it.
Step 9: Insert the outside brake shoe at a slight angle; placing the bottom in first. Snap it in by pressing the top.
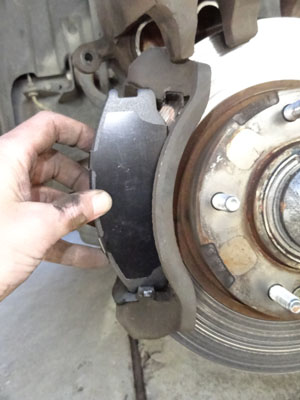

Step 10: Insert the inside brake shoe. This goes straight in without needing to angle it.

Step 11: Reposition the caliper and put the screw the top bolt in. However, do not tighten. This will allow you to maneuver the caliper and align the bottom bolt.

Step 12: After both bolts are in place begin tightening. Alternating (3 times) between the top and bottom bolt, tighten the same torque as when you removed them. (I don't have a torque wrench, just be certain they're tight). I typically tighten and then lightly tap the wrench twice with a hammer.

Step 13: Finishing up. So, your brakes are changed and now you need to put the tire on (you may need to jack the car up a little if the tire is difficult to put back on. A good way to do this with minimal strength.
-Line the bolts from the rotor to the wheel.
- Angle the bottom part of tire under rotor
- Push the top part of tire into place.
Step 14: Place lug nuts back on. Alternate when you tighten in a pattern similar to drawing a 5-pointed star. Why, it keeps the tire flush and limits any unnecessary rub on bolts.
- While the vehicle is still on the stands, tighten the lug nuts until tire begins to spin.
- Raise the car with jack and remove stand.
- Using the jack, lower the car until the tire is to the point where it is touching the ground but not the entire weight of vehicle. Why? In case the tire is not flush with, when you put the weight of the vehicle on the rim and tire, it can get slightly askew. Granted, you can still tighten the nuts if you lower the jack all the way, but I'm a bit methodical and diligent.

Step 15: REMOVE THE BLOCK BEHIND YOUR CAR!!! Yes, I have forgot before. When you back up it won't be good... usually.

No comments:
Post a Comment