Pages

Saturday, March 22, 2014

Precision Camera University t-shirt logo!


Held in New Braunfels, Texas at the T Bar M resort, Precision Camera University brings together novice to advanced photographers for a three-day workshop. For this event, registrants choose three classes (one per day) from five, allowing them to focus on specific aspects of photography - HDR, wedding, portrait lighting, and workflow are some of the topics covered.

The past few years the t-shirt logo was unoriginal and nothing to write home about. This year I was allowed the time and creativity to design the above mark. One of the design elements that almost didn't make it is the dial; Some people will get it and others won't. I choose to think that people are bright enough to ask why the edge has ridges. After all, photographers are typically creative thinkers and can deduce why design elements exist. Thankfully, I won the design battle with help from Mandy, Director of PCU.


Saturday, February 23, 2013

I took a brake break

The past week my brake started squealing like guinea pig; front right to be exact. A few months ago I only changed the left front and didn't have time to complete the job. So, today, was the time for finishing.

For some reason I had the vision of the jack collapsing and felt I needed someone around in case of emergency. So, I called a good friend and asked to borrow his driveway. Tiger is his name - his real name. His wife is equally incredible: http://kimmanthey.com/


Disclaimer: I am not a professional mechanic and these instructions can be used as a basic guideline to replace your front brake shoes on almost any caliper brake vehicle. Mine so happens to be a 2005 Kia Sorento. Also, it is recommended to use brake grease (which I did not use, never have) and did not replace a hard plastic spacer on the outside brake shoe. The plastic piece is placed on the outside part to prevent the caliper from sticking to the shoe... which again, I have never used. Please use all precautions, blocks, braces, engine off, emergency brake off.


Tools: 14mm socket wrench, hammer, 4" C-clamp, block of wood (i have a small cut 2x4), lug nut wrench, jack,  jack stand, and a block, brick or something to use to place behind back tire.

Here is a handy diagram of a brake caliper: http://auto.howstuffworks.com/auto-parts/brakes/brake-types/disc-brake5.htm

Step 1: Loosen lug nuts of tire while still on ground.


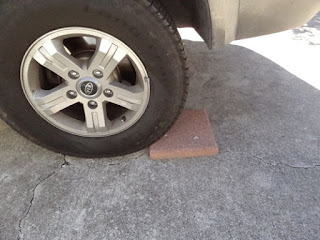
Step 2: Place block(s) behind rear tires for safety.


Step 3: Place jack under frame (consult your manual to find proper placement) and have jack stand ready.
After the tire you are removing is off the ground - when you get close the tire should shift. Once the tire shifts, raise the height using the jack so your jackstand will fit and support your vehicle. Slide the stand into position and slowly lower the vehicle down so the weight of the vehicles is properly supported. I leave the jack in place in case the stand slips and there is a backup support. If you use a hydraulic jack, make sure the release valve is tightened.


Step 4: Remove tire

Step 5. Using a 14mm socket, remove the two bolts holding caliper to rotor.


Above: finger pointing to the top bolt and wrench on the bottom.


Step 6: GENTLY use the claw side of hammer to remove caliper. Notice the emphasis on gently, I don't want anyone to damage anything. You will be able to see how the caliper is distancing itself. Alternate between the top and bottom (shimmying) until it comes loose. DO NOT LET THE CALIPER HANG FROM THE HOSE!!!!! In the photos, I am either supporting with my hand or it is resting on the rotor.

Above: Use the two spaces available to pry the caliper off.


Above: You will notice the extra piece of hard plastic on the brake shoe. Do not let caliper hang by hose!!!


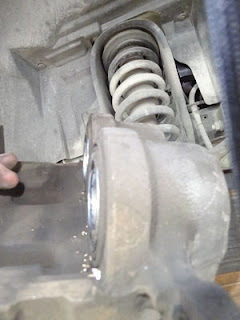
Step 7: PISTONS. This is, honestly, the only tricky part. Here you will use the 2x4 and c-clamp. You don't need no sticking badges... or fancy tools.

-Place block at the top of the pistons.
- Using c-clamp position as in the photo.
-I have two pistons to depress, so tighten one side then the other. Repeat this until both sides are flat.

------
Above: Pistons fully depressed.


Step 8: If you have brake grease, now is the time to use it.

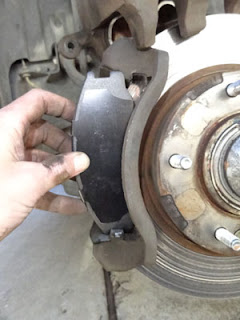
Step 9: Insert the outside brake shoe at a slight angle; placing the bottom in first. Snap it in by pressing the top.


Step 10: Insert the inside brake shoe. This goes straight in without needing to angle it.


Step 11: Reposition the caliper and put the screw the top bolt in. However, do not tighten. This will allow you to maneuver the caliper and align the bottom bolt.

Above: Notice that the bolts are not all the way in.


Step 12: After both bolts are in place begin tightening. Alternating (3 times) between the top and bottom bolt, tighten the same torque as when you removed them. (I don't have a torque wrench, just be certain they're tight). I typically tighten and then lightly tap the wrench twice with a hammer.


Step 13: Finishing up. So, your brakes are changed and now you need to put the tire on (you may need to jack the car up a little if the tire is difficult to put back on. A good way to do this with minimal strength.
-Line the bolts from the rotor to the wheel.
- Angle the bottom part of tire under rotor
- Push the top part of tire into place.


Step 14: Place lug nuts back on. Alternate when you tighten in a pattern similar to drawing a 5-pointed star. Why, it keeps the tire flush and limits any unnecessary rub on bolts.
- While the vehicle is still on the stands, tighten the lug nuts until tire begins to spin.
- Raise the car with jack and remove stand.
- Using the jack, lower the car until the tire is to the point where it is touching the ground but not the entire weight of vehicle. Why? In case the tire is not flush with, when you put the weight of the vehicle on the rim and tire, it can get slightly askew. Granted, you can still tighten the nuts if you lower the jack all the way, but I'm a bit methodical and diligent.


Step 15: REMOVE THE BLOCK BEHIND YOUR CAR!!! Yes, I have forgot before. When you back up it won't be good... usually.


Saturday, February 9, 2013

My potato cakes

Last night was the Pinterest party. No crafting but an assortment of delicious appetizers and desserts. Again, not being an experienced cook, my dish was quite good. I arrived a tad late due to my pet sitting job which may have been for the best.

Krista, the host, was accommodating to my needs for the kitchen utensils and stove. Grabbing a mixing bowl, fork and milk, I rapidly mixed in the egg, cheese and milk to the existing mashed potatoes. Apparently watching me work is entertaining. My focus can be rather intense and my methods unique.

In short, it took a few cakes to figure out timing on the stove coupled with the amount of oil to use. The guests liked them, "Tasty" and "Delicious" complimented my achievement. So, overall a success and a rewarding experience. Next time I make the little patties, there will be basil, tomato and mozzarella added to the top.

Thursday, February 7, 2013

Pinterest Party? Ok, I'll go.

A good weekend planned. Attending a friend's Pinterest party on Friday evening... sounded interesting so I am going. Apparently this type of party is popular these days. Filled with scissors, food, glue, fabric, paper, beer, wine and good friends. Being the crafty type, or better word for me is creative type, I decided to go all in. First you have to bring a dish from somewhere on Pinterest.

I'm not too confident in my culinary arts so I found something that wouldn't be too difficult to mess up. Potatoes! Fortunately, on Wednesday, we received a large sum of baked spuds from my roommate's work potluck. A quick search led me to this http://www.justputzing.com/2012/01/loaded-mashed-potato-cakes.html. My journey may have been easier with unbaked potatoes but I had them and used them.

Peeling theses starch bombs was a little challenging. I saw on a television show to put them in ice water and their skin will wipe off. What not to do? Put cold potatoes in ice water. This is not a successful way. So, with suggestion from the experienced chef, I heated them in the microwave and tried again. Sad face here. Not to be thrown asunder and beat by my earthly nemesis, my fingertips and nails tormented five of them. You might think this was a bad horror movie for vegetables. God, what did I do to these things? Wet, pale, mangled and gouged. I stopped and used a knife for the rest of them, slicing off burnt skin and dried meat parts. It happens. I now know, just use a peeler or knife, t.v. miracles don't work in my home.

*One thing I was unaware of, when working with potatoes, recipes use pounds for the amount to be used. I don't have a food scale. Time to wing it.

After slicing the potatoes into mini potatoeses, I added over the recommended amount of butter (2tbsp) and threw them back in the nuker to soften them up for mashing. *Oh yeah, I also had rosemary from the yard baking in the oven to dry it out (150 degrees until dry) which I also added to the heated mess. Scoop by scoop and the transferring of hot steamy buttery potato bits into the metal bowl was complete. Masher in my right hand, cradling the bowl with my left, then mash-mash-mash. I should have used beaters... had to experience it though. I added milk, spices and more butter throughout until the consistency was appropriate (by my right arms standards).

Since the dish is lightly fried, I gathered all the ingredients for tomorrow's event and hopefully will prevail with something mind blowing. Or, at least decent enough to eat. Eggs, bread crumbs are ready and will head to the store to find a cheese to mix in. Egg is still in shell; I don't want mr. egg contaminating anything overnight.

Please, please, please let me not get anyone sick with food poisoning; I was ill for seven days from a rotten egg (i think)... worst experience of an illness ever. I scoff at the flu now. Thanks eggs! You made me stronger yet weaker. The incredible salmonellable egg!

The other part of the party is to pick a craft from Pinterest. This I haven't even researched. The meal needs my undivided attention. I can hack and crack crafty crafts on a whim. But, I think I may make diaper wraps for my wheelchair pooch. He has five: three made by me and two store bought which rubs his masculinity raw... if used everyday.

I'm tired. Good night.

Sunday, February 3, 2013

Sunday.. funday? Yes, I think so. While the hordes of America setup their parties for a Super Bowl gathering, I am content being a bit more productive.

Back in December I was pet sitting in Round Rock. Driving up to the nice 3,000 sq. ft. brick house I noticed a few items set by the curb. The only available light is the dim glow of reds, blues and greens from the festive Christmas season. The silhouette of a lonely lawnmower set by the curb next to a small black plastic tub entices me. I'm not typically a hoarder or garbage junky. But, I could guess that the Briggs & Stratton wasn't seriously injured.

So, hastily I opened the garage door and brought it inside. Thankfully I did as moments later a silver Chevy 2500 crept down the street stopping where my new found friend once was. I would bet it was another "placed on curb" ad on craigslist. Serendipity for me! Yay! After this small victory I continued with my services of feeding two silly cats. I played with one, the other is a bit older and skulky. Cat box cleaned, water freshened - I pack up my mower, because it is mine now, and head home.

Next day, I look over the B&S. It's a nice mower, 4.5hp, which is .5 more horse power than my existing yard destroyer. I add some fresh gasoline, prime it and pull. It putts and putts but doesn't start. No big deal, at least the pull is solid so it's not stripped. I swap out spark plugs with my mower that runs. It has a little more chug in its voice. One problem down, bad spark plug. I mess around with it for a little more, spraying starting fluid in the carburetor and it starts! It starts and then dies.

It was a bit cold out and like some of my other adventures, I put it to the side. Which, brings me to today. February 3, 2013.

Knowing that the problem with the engine is the flow of fuel to the engine I dismantle the carb. I clean it up, blow air through the floater and reassemble. Again I spray starting fluid and the poor mower starts and dies. Darn. Since I don't typically work on mowers I need to do some swapping of parts with old trusty. Problem solving somehow is innate for me.

Back to my knees with sockets and a screwdriver. I proceed to put the working gas and carburetor housing thingy (from old mower) on the curb-side machine. Prime, add some starting fluid, hold down the starting handle and pull. Black smoke slightly billows from the exhaust but the distinct sputter of a running mower is heard. Yes, another victory for me. Now I know the new mower is functional when adding the known-working carb, it's time to deduce what is wrong with the carburetor from Curby (that's what I call the new mower).

The carburetor on a mower has a small amount of parts that can go wrong. I exam and check airways, spray copious amounts of cleaner... something crosses my mind that I entertained but didn't think it would keep gas from flowing. The gas must flow! On the bottom of the carb there are two pieces: a gasket (which looked fine) and a diaphragm (which seemed a little floppy). I look online at some sites and not a mention of this causing a mower not continue to run. However, everything I read was not germane to my problem.

I thought this nice locally-owned garden shop called Gaddys would probably have this gasket/diaphragm combo. I know they do repairs on mowers but didn't recall seeing these small pieces for sale. I call them and ask if they sell gaskets for mowers and was asked if it was the setup with the carburetor on top of the gas tank. I say "Yes, it's a Briggs & Stratton 4.5hp engine. The typical engine on mowers."
"Just a second, I'll check."

A few seconds later he said they have gaskets and diaphragms. "Rad, I'll be right there. Thank you."

Off I went to Gaddys in Pflugerville, I brought my carburetor to be certain to get the correct part. I have gone to grab parts before only to get the wrong one. Which, after many times of thinking I can remember the right part, I knew I would manage to get the undesired outcome. Plus, they can see what I need and wouldn't need to rely on my random vague descriptions.

I get there and they had the part waiting for me. I look at it and it's not the proper item. Handing over my little piece of plastic for them to evaluate, he heads to the back of the store and exits the "Private" door. After several minutes I am thinking they may not have it, but I knew I can still buy online. Thankfully he comes out with a small plastic bag within it the two pieces I need. I proceed to tell them I'm lucky there is such a great store so close to my home, thank him and head off to finish my project.

Not knowing exactly how to install these pieces (like if i need any glue or sealant) I use the google youtube combo in hopes some awesome person posted a video. This guy http://www.youtube.com/watch?v=C5nzigcNTwo showed me that nothing other than cleaning the pieces and positioning them and affixing with screws works. Now I'm ready to try again.

All parts together, throttle position springs in place, more starting fluid (maybe it went to my head a bit, lots of gas fumes for me... Sunday Fume Day) and fingers grasping the handle ready to pull. I slightly hesitate thinking - if this doesn't work I will need to return it to its last home, back to the curb for another person to claim as theirs. I lean over to my right, solidly gripping and yank. It started!! So excited. Premature happiness... again it dies. Okay, it ran a bit longer than the last time though. Hope is not lost on my new little friend. Using more starting fluid and priming the hell out of it, I start it again. However, this time I do a balancing act. Holding down the shutoff handle with my left hand, I reach over and keep a finger on the primer bulb. Once I start the mower it rumbles and then shakes, this is when i prime the engine again. Still running. Rough but running. I continue to do this for 30 seconds as the engine wants to shut down. This engine doesn't own me.

Rumble, sputter, sputter and then I mess with the throttle position springs and rev it up. Sounds like a small prop plane but steadies in its cadence and once again the sound of a functioning mower is heard in my neighborhood. Success! I let it run for a minute and shut it down. Let it sit for a few more minutes and hope that it wants to be good and run for me. I press in that red primer bulb two times, stand back a rip away on that pull strings and it ignites with sound as previously heard.

I smile to myself with achievement knowing persistence, determination, troubleshooting and the internet has made this day a truly Sunday Funday. 

Saturday, February 2, 2013

New Year, New Ideas

So with the not so new year, new ideas are coming on how to re-use unwanted items that are bad for the landfill. Items like cds, vcr tapes and other plastics need to have a new life besides the deprecated one that awaits in the dump.

However, first I will be finishing my weebly site and then move on to other things. One big accomplishment this year is a final step-by-step pattern of Cow/Bull-lop on a great site called youcanmakethis.com. The cover art is on here and will also be displayed on my artist site.

Monday, August 23, 2010

Past Clients

  1. Time Warner Cable - National Division
  2. United Rentals - National Division
  3. KROX
  4. Precision Camera & Video
  5. Johnson Communities
  6. SBR Creative
  7. Sony Game Division
  8. Horty & Horty, P.A
  9. Canon USA
  10. Big Red Sun